The Science of Photography - Subject Lighting
|
Chemical Image Processing | Digital Image Processing Subject Lighting | Halftone Reproduction | Mechanical Printing |
- Daylight
- Sources of Artificial Light
- Colour Quality of Artificial Light
- Illumination from Artificial Light
- On Camera Flash
- Studio Lighting
| Daylight |
Daylight is the most common method of illuminating photographic subjects, however donít take it for granted. Daylight must be used intelligently because the quality and colour of sunlight varies depending upon the season, weather conditions as well as the time of day.
An overcast sky scatters sunlight to give nearly shadowless lighting. This subdues textures and helps to record detail. Direct sunlight on a clear day casts deep shadows that emphasises textures. In these conditions it maybe necessary, for fashion and portrait photography, to use Ďreflectorsí to light the shadow area. A large white sheet of card is sufficient to reflect light into the shadow areas. However reflectors come in many different shapes, sizes and materials for specific effects.
| One of the main disadvantages
of using daylight is that the weather conditions, and therefore the quality
of light, is unpredictable and may change rapidly.
More predictably the sunlight changes direction steadily thought the day, making timing important for many types of outdoor photography. Also the colour of sunlight changes between dawn and dusk. At noon when the sun is overhead the rays of light travel directly through the narrowest band of the atmosphere. The sun appears yellow, due to the combination of green and red waves, and the sky looks blue. |
In winter the days grow shorter and the sun is much lower in the sky, again weakening the light as at dusk and dawn.
Daylight is very difficult
to control, therefore alternative light sources are often needed to replace
or supplement the sun.
| Sources of Artificial Light |
The two artificial light sources that photographers are most interested in are incandescent electric lamps and electric discharge devices such as electronic flash.
Light from an incandescent lamp is produced by an electric current heating a tungsten filament enclosed in a glass bulb. The bulb is filled with a mixture of argon and nitrogen gases.
There are a variety of different types of incandescent lamps ranging from the normal domestic light to high output photoflood lamps. A special type of incandescent lamp is the tungsten halogen lamp, in which a halogen is added to the filling gas, the gas is under high pressure and is contained within a small strengthened glass bulb.
Flash units build up a high voltage charge which is discharged through a tube filled with a mixture of gases, usually krypton, argon and xenon. These gases glow brightly during the very short duration of the electronic flash.
Flash units range from small devices built into the camera to studio units with modelling lamps that give an indication of the lighting effect.
| The studio flash on the right is being used with an umbrella reflector to soften the light. |
 |
| Colour Quality of Artificial light |
Although we perceive that most artificial light sources give "white light" in fact they all vary considerably among themselves and from daylight. These differences appear as colour casts on daylight balanced films. For example the light from household incandescent bulbs produces an orange colour cast.
For more information please
refer to White
Light and Colour Temperature in the Colour
Reproduction section.
| Illumination from Artificial Light |
Illumination from a light source reduces considerably over distance. The relationship between illumination and distance from source is explained by the "Inverse square law of illumination". For example if you double the distance then the illumination is reduced to a quarter of its original value.
| The "Inverse square law of illumination", as shown on the right, states that the illumination is inversely proportional to the square of the distance from the point source of light. | 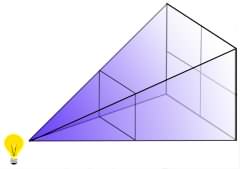 |
A diffuser, such as tracing paper, can be placed in front of the light source so it scatters the rays and produces a soft even light without strong highlights.
Light may be bounced off a reflector before it reaches the subject, this again produces a soft light and can be used to fill in shadow areas. Walls, ceilings or bits or white card can all be used as reflectors. However coloured reflectors can introduce a colour cast.
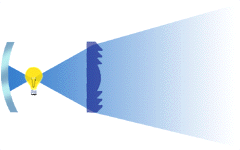 |
A condenser lens placed in front of the light source, either an incandescent bulb or a flash tube, enables the spread of the beam to be modified by varying the distance between the light source and the lens. Move your cursor over the links to see how the beam changes. | |||||
|
| On Camera Flash |
Flash units are often built into cameras. Although these are convenient to use they have a number of disadvantages. For example they produce very harsh lighting that creates sharp clear-cut images that are often unflattering to the subject.
Also as the light source is close to the cameraís lens the flash often illuminates the blood rich retina in the subjectís eye, producing the "red eye" effect.
In order to gain more control over lighting a separate flash gun is usually necessary. These units can be directly mounted on a cameraís hot shoe or for off camera work they can be connected by a synchronisation cable.
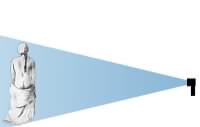
The flash head on these units can usually tilt and swivel to facilitate bouncing light off suitable surfaces. The head could also have a condenser lens to vary the spread of light, depending upon the focal length of the lens being used.
 |
 |
|
|
|
With manual flash guns the lens aperture is adjusted to control exposure, with automatic units the light is reflected back to the unitís sensor. When the unit has received enough light the flash switches off. With a fully dedicated flash gun a sensor on the camera is used to control the flash.
Direct flash illumination falls off sharply, as explained above by the Inverse Square Law, so subjects further away get less light.
Electronic flash is of a very short duration therefore the camera shutter needs to be fully open at the time the flash fires, this is the cameraís flash synchronisation speed. Please refer to the section on camera shutters for more information. Shutter speed does not affect flash exposure but it does determine the exposure for other parts of the image illuminated by available light.
Fill-in flash is a technique
that uses the sun as the main light source and uses the flash to fill in
more detail in the shadow areas.
| Studio Lighting |
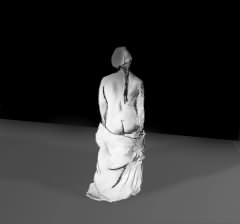
Studio lighting gives the photographer full control and a great number of effects can be produced.
Move your cursor over the
links below to see a few of the possibilities. Final image is shown on
the left, the lighting set-up used is on the right.
 |
|
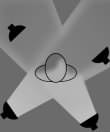 |
The first main light is placed
to the front right of the subject. This light reveals some shape and texture
but leaves the left side hidden in dark shadow. The second light is placed
to the front left and fills in the shadow area. The third light is positioned
high at the real left, picking out highlights in the head and upper body.
Finally a light illuminates the background.
|
Forming
the Image | Controlling
the Image | Colour
Reproduction
|